By Linda Andersson Three years ago, I used to blog and make cryptocurrency related videos, but then things got really tight in the market, so I locked everything down and didn't look back... Until around the holidays, last year when the BTC numbers started to look really good again. I visited my accounts earlier in 2020, to make sure I hadn't sold anything that needed to be reported on my taxes, but that was the extent of it. I wasn't researching any new coins until I was cleaning up my Bittrex account and sold off what was practically dust in 2018 for around ten bucks. This was when my inner voice said, "the time has come". So, there I was reorganizing old coins. Some of them worthless, crypto dust in the wind, some of them like sleeper agents ready to get back into the game, and it was up to me to put them into play. Several of my friends and acquaintances are getting into the game again too. So, you may see some more trading related posts from me now. I am not
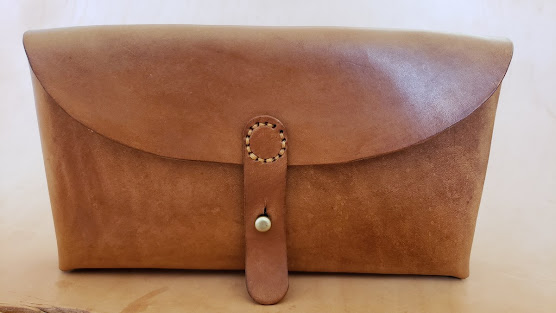
By Linda Andersson Sometimes there are projects, I talk myself out of taking on, but somehow they still mysteriously end up in my Etsy shopping cart anyway. And then they sit there for a while until I get notified when they go on sale, and the next thing you know, I’m printing out the pattern. This was the case with JamesBerryLeather Pattern “Swiss army leather ammunition pouch from the 1960's - for Stgw57 cartridge”. I loved it when I watched his video on YouTube and inquired about the design of the pattern. James is a very skilled leather worker. There is no doubt about it, but my question to him was whether or not the stitching holes were marked on the pattern. He quickly replied to tell me that only a stitching line was printed on the pattern as a guide. And this was why the pattern stayed in my shopping cart for over a month. You see, I work best with patterns that have the holes marked for punching. I have a drill press, I converted mostly to keep it quiet from within our
By Linda Andersson If you enjoy having a bit of cake with your coffee or tea, or just on its own, this old reconstructed Scandinavian recipe will do the trick. For this recipe, you’ll need at least an 11 ounce coffee mug and a microwave oven. Mix together the dry ingredients in a small bowl and set them aside. Dry Ingredients: 3 Tablespoons Flour 1/8 Teaspoon Salt 1/8 Teaspoon Baking Soda 1/4 Teaspoon Cinnamon * 1/8 Teaspoon Nutmeg * 1/8 Teaspoon Ginger * *1/2 Teaspoon of Pumpkin Spice may be used as a substitute for the combination of Cinnamon, Nutmeg, and Ginger if that’s what you already have at home. Wet Ingredients: 1 Tablespoon Softened Butter 2 Tablespoons Sugar 1 Egg 1 Teaspoon Brewed Coffee 1 Tablespoon Applesauce Optional: 1 Tablespoon Raisins Continue by softening the butter inside of the mug. Since this is a recipe for such a small amount of cake, the butter acts as both a fat for the cake and to help prevent it from sticking to the walls of the mug as it bakes. Using a


Comments
Post a Comment