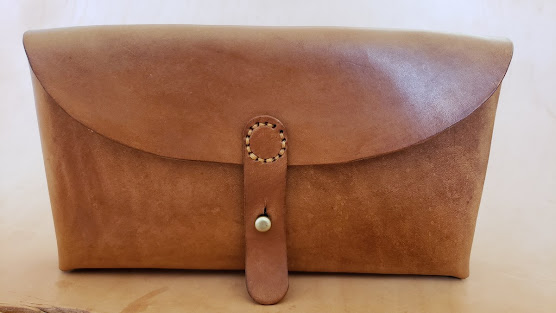
Swiss 1960’s Army Replica Leather Ammo Pouch - Pattern Review

By Linda Andersson
Sometimes there are projects, I talk myself out of taking on, but somehow they still mysteriously end up in my Etsy shopping cart anyway. And then they sit there for a while until I get notified when they go on sale, and the next thing you know, I’m printing out the pattern.
This was the case with JamesBerryLeather Pattern “Swiss army leather ammunition pouch from the 1960's - for Stgw57 cartridge”.
I loved it when I watched his video on YouTube and inquired about the design of the pattern.
James is a very skilled leather worker. There is no doubt about it, but my question to him was whether or not the stitching holes were marked on the pattern. He quickly replied to tell me that only a stitching line was printed on the pattern as a guide. And this was why the pattern stayed in my shopping cart for over a month.
You see, I work best with patterns that have the holes marked for punching. I have a drill press, I converted mostly to keep it quiet from within our 3rd floor apartment.
But when the pattern went on sale, I realized I could adapt it ever so slightly by marking the holes myself, so I finally broke down and bought the pattern.
I chose a 4-6 ounce veg tan scrap that was just big enough to make this case. It had some marks on it from being tossed around over the last few months, so the fact that it’s going to be used to make something that needs a 1960’s vintage look, then a few scars in the leather will only add to its authenticity.
After punching the holes and cutting out the pattern, it became time to decide what I was going to do about the color for this item.
I do love the patina of aged veg tan leather, but didn’t want to use a commercial dye to attempt to replicate that look. But, then I remembered a batch of natural brown dye I had whipped up a couple of weeks prior, which I made out of coffee and alcohol.
I had ground down some inexpensive coffee into a fine espresso-like powder and soaked it in enough alcohol to make it into the consistency of a slowly melting slushy. The total concoction fit into a 4 ounce bottle.
As a side note, since there seems to be a rubbing alcohol shortage, I actually used some forgotten gin from the liquor cabinet. The gin worked perfectly and made it so I didn’t have to add any additional water. After straining the liquid through a coffee filter, it didn’t leave me with too much of the dye to work with, but it was just enough for this bag.
I used a soft rag to paint on several coats of the stain. I let the pieces dry overnight and then oiled them with mink oil, buffed and waxed them. The final finish is a very nice golden honey and days later still has a very pleasing distillery scent to it.
I chose a beige thread to continue giving the piece that classic look that had originally caught my eye. As far as the hardware went, I chose antiqued brass instead of the silver D-rings and Sam Browne button or back copper rivet since I wanted to give it less of a “standard issue” look.
Anyway, I love this pattern and am very pleased with the results. If you’re interested, please stop by James’ Etsy Store to see this pattern along with several other really nice items, he has for sale there.
Tools and Materials:
Beginner’s Leather Kit Leather Hole Punches Veg Tan Leather
Leather Dyes D-Rings 20mm Rivets Sam Browne Buttons
Thread & Needles Getting Started in Leather Crafting BOOK
This post contains affiliate links, which means I receive compensation if you make a purchase using these links.
Copyright 2020 Linda Andersson


Comments
Post a Comment